
When it comes to maintaining your HVAC system, charging the refrigerant is a critical task that should not be overlooked. A properly charged HVAC system ensures efficient cooling and heating, maximizes energy efficiency, and prolongs the lifespan of your equipment. In this comprehensive guide, we will walk you through everything you need to know about charging your HVAC system—from understanding the fundamentals to mastering the process with precision.

What is HVAC Refrigerant and Why is It Important?
HVAC refrigerant is a substance that plays a crucial role in the heating, ventilation, and air conditioning systems. It circulates through the system, absorbing heat from indoor air and releasing it outdoors. This process allows the HVAC system to maintain the desired temperature within a building. The refrigerant works by transitioning between liquid and gas states, and it must be charged to the correct levels for the system to function properly.
If your system is low on refrigerant, it could lead to inefficient cooling or heating, increased energy consumption, and potential damage to the compressor. Ensuring the correct refrigerant charge is essential for the optimal performance of your HVAC unit.
Signs Your HVAC System Needs Charging
Before you begin the process of charging your HVAC system, it’s important to recognize when it’s necessary. Some common signs include:
Warm air: If your air conditioner is blowing warm air or not cooling your space adequately, it might indicate low refrigerant levels.
Longer cooling times: When refrigerant is low, the system has to work harder and longer to cool the space.
Ice buildup: Ice forming on the coils of your HVAC system suggests low refrigerant levels, which can lead to damage if left unaddressed.
High energy bills: A system with low refrigerant may run longer, consuming more electricity, which reflects in your energy bills.
If you notice these symptoms, it’s time to check the refrigerant levels and recharge the system.
The Tools You’ll Need to Charge Your HVAC System
To successfully charge your HVAC system, you’ll need a few essential tools and materials. Here’s a list of what you’ll require:
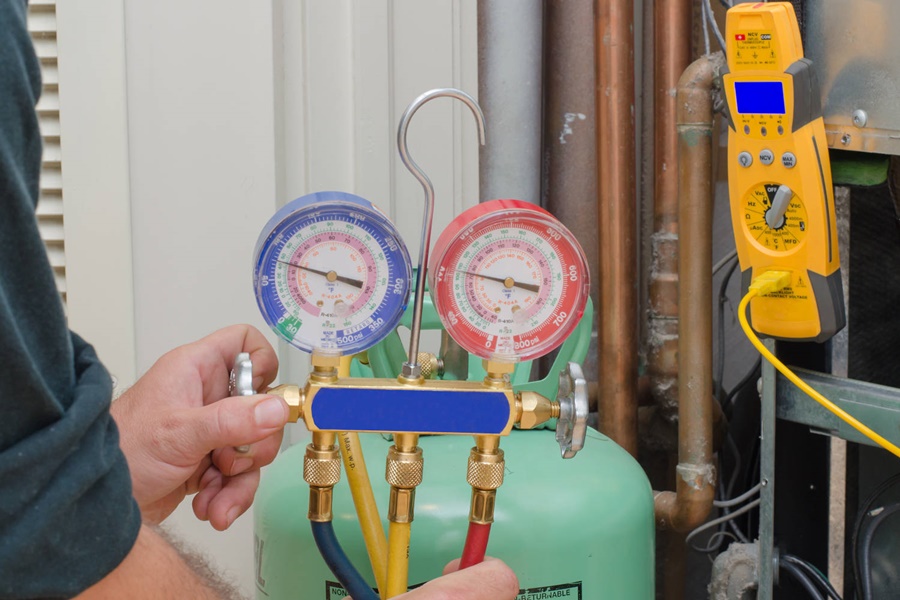
Manifold gauge set: This tool allows you to measure the pressure within the HVAC system and determine the refrigerant charge.
Refrigerant: Make sure you have the correct refrigerant for your system. Most systems use R-22 or R-410A, but it’s important to verify this before proceeding.
Thermometer: A thermometer will help you monitor the air temperature to determine whether the refrigerant levels are correct.
Suction hose: You will need a hose to connect the manifold gauge to the HVAC unit.
Safety gear: Always wear safety goggles and gloves when working with refrigerants to protect yourself from any harmful exposure.
Step-by-Step Guide to Charging Your HVAC System
Step 1: Turn Off the HVAC System
Before you begin any work on your HVAC unit, ensure that it is completely powered off. This is a critical safety step that will prevent accidents. Shut off both the thermostat and the main power to the unit.
Step 2: Attach the Manifold Gauges
Take the manifold gauge set and connect the low-pressure hose to the suction port (usually marked with an “S”) and the high-pressure hose to the discharge port (marked with a “D”). The other end of the hoses will connect to the refrigerant supply tank.
Make sure the gauges are properly calibrated, and check for any visible leaks before proceeding.
Step 3: Check the Existing Pressure Levels
Before adding any refrigerant, it’s important to assess the current pressure levels within your HVAC system. Refer to the manufacturer’s specifications for the correct pressure readings. The low-side pressure should be between 40-70 psi, and the high-side pressure should range from 150-250 psi, depending on the type of refrigerant and ambient temperature.
If the pressure is significantly lower than the recommended values, your HVAC system needs a refrigerant recharge.
Step 4: Start the HVAC System and Begin Charging
Power the system back on and set the thermostat to the cooling mode. Open the valve on the refrigerant supply tank to begin transferring refrigerant into the HVAC unit. Charge the system slowly, monitoring the pressures as you go. Do not overcharge the system, as this can cause serious damage to the compressor.
Keep an eye on the manifold gauges while adding the refrigerant. Stop charging when the system reaches the optimal pressure levels specified by the manufacturer.
Step 5: Monitor Temperature and Pressure
As you charge the system, periodically check the ambient temperature and pressure readings. Use the thermometer to check the air temperature coming from the unit’s vents. It should start to cool efficiently within minutes. If the temperature is not dropping, you may need to adjust the refrigerant charge or investigate potential issues with the system.
Step 6: Close the Valves and Disconnect the Hoses
Once the refrigerant has been fully charged and the system is performing optimally, close the valve on the refrigerant supply tank. Then, safely detach the hoses from the manifold gauges. Remember to turn off the manifold gauges to release any trapped pressure, ensuring no refrigerant is lost in the process.
Step 7: Double-Check for Leaks
The final step involves checking for leaks. Use a leak detector or soapy water to inspect the connections for any signs of refrigerant leakage. If a leak is detected, it must be fixed before the system is used further.
Common Mistakes to Avoid When Charging Your HVAC System
Charging your HVAC system correctly is vital for both the safety of the system and its long-term performance. Avoid these common mistakes:
1.Overcharging the system: Adding too much refrigerant can increase system pressure and damage components, especially the compressor.
2. Using the wrong refrigerant: Different systems use different types of refrigerants. Always verify the correct refrigerant type before adding it to the system.
3. Ignoring manufacturer specifications: Failing to follow the manufacturer’s pressure and temperature guidelines can lead to inefficient performance or damage to the unit.
4. Not performing routine maintenance: Regular maintenance checks can help you spot refrigerant issues early and prevent major breakdowns.
When to Call a Professional HVAC Technician
Although charging your HVAC system is a manageable task for some, there are times when it’s best to consult a professional. If you’re not comfortable performing the task yourself or if the system continues to show signs of low refrigerant despite proper charging, it’s time to call in an expert. A certified HVAC technician can diagnose potential issues, ensure proper refrigerant charging, and perform any necessary repairs.
Conclusion
Charging your HVAC system is essential for maintaining its efficiency, performance, and longevity. By following this step-by-step guide, you can ensure that your system is charged correctly and avoid common mistakes. Regular maintenance and careful attention to refrigerant levels will keep your HVAC unit running smoothly and save you from costly repairs.